![]()
Build Your Own Studio: The $100,000 Studio
Fixing Acoustic Problems, Adding a Classic Neve VR Legend
By Wes Maebe
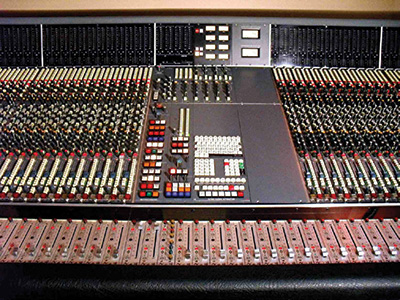
Neve VR Legend Console
That time of year has come again, where Markkus Rovito and I take a look at how to improve on your current setup.
In the previous installments of BYOS, I have focused mainly on the centerpiece console, various microphone selections, monitors and outboard gear. So let’s assume this year that the studio is up and running and I only need a couple of equipment upgrades; more importantly, we’re going to examine the room acoustics closely.
I’m going to start with the premise that the control room and live room are in place. The studio has been running for a while now and we’ve gone from a small- to medium-format console. The time came to sell some of those and install a console that came up for sale. The 26.5 x 14.8-foot control room now houses a 60-channel Neve VR Legend with some cool outboard we hung on to and to which we’ll add some funky bits and pieces.
The Neve was acquired, fully recapped, for $37,000. This leaves $63,000 for us to play with, installing some extra sonic flavors and sorting the rooms out acoustically.
Obviously I have Neve preamps coming out of my ears on the VR, but I always like to have a few different options in the bank. Four alternatives should supplement the range nicely. The API 512V ($845.75 x 2 = $1691.50) will provide that classic API punch, Meris 440 ($549) can look after guitar and bass duties, the Millennia HV-35 ($718.99) offers high-end clarity, and a newcomer, the Advanced Audio MT8016 ($995), which was developed with Malcolm Toft and sounds absolutely amazing!
The console also offers dynamics and EQ on every channel; however, I’d like to have just a handful more. A couple of API 560s ($803.25 x 2 = $1,606.50), mainly to handle that in-your-face guitar punch, a pair of API 565 filter sets ($505.75 x 2 = $1,011.5) to help with cleaning up some of the signals, and I have to include Dave Hill’s Cranesong 500 Series Insignia ($1,299) tube EQ—this unit works miracles on pretty much everything.
The studio is pretty much set with gear as we opened a few years back, but I’d like to add an extra Meris Mercury 7 ($549) to the mix, just because it’s such a cool reverb that blends so well and is so off the wall.
To house all our 500 Series modules, I’m choosing the WesAudio Supercarrier ($678) 10-slot rack.
With a lot more virtual reality, 360 and surround work popping up these days, it’s time to bite the bullet and install a 5.1 rig. The responsibility of reproducing falls to Swiss-based loudspeaker manufacturer PSI Audio.
I recently came across the PSI speakers and was blown away by the sound, the imaging and the way they translate to other systems. Left, center, right and both surrounds will be PSI A17 M ($1,660 x 5 = $8,300), and the sub is an A225 Sub ($3,884.9). Controlling the surround setup will be the Cranesong Avocet IIA ($8999).
TIME FOR TREATMENT

Impulse Response
A huge chunk of the budget will go toward the acoustic treatment and optimization of the live and control rooms. One of my fields of study in college was acoustics, so I have a basic understanding of the subject and am able to sort out certain problems, but when it comes to improving your room, it really pays to get someone in who does this for a living. For this next segment, I had to draw on Dirk Noy’s vast knowledge of acoustics and everything related to the topic.
I first met Dirk at an AES student event in Switzerland and I subsequently hired him to help me rescue a bad control room when I was mixing in a residential studio in the Swiss pre Alps. Dirk works for Walters-Storyk Design Group, so I left it in his very capable hands, with me looking and listening and asking a lot of questions.
Both the control room and the live room had some treatment when they were built initially, which offered Dirk a good starting point. But undertaking acoustical measurements is a vital first step in assessing the acoustical conditions in any given space. You need to know the cause of the problem in order to prescribe the most effective remedy.
Taking an acoustical measurement of the space means capturing the Impulse Response. A loud impulse is injected into the room through an omnidirectional loudspeaker radiating spherically from a center point. A measurement microphone then records the signal over time. The direct sound will exhibit the shortest path length and will show up as the first and loudest signal at the measurement mic. Subsequent reflections off surfaces (with longer travel paths and usually decreased loudness due to absorption in materials and air) will arrive later in time.
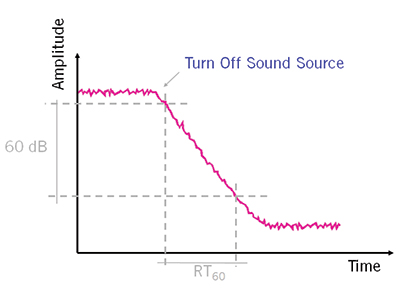
Measurement of Reverberation Time
Reverberation Time, meanwhile, is essentially measured by timing when the sound level reaches a value of 60 dB below the initial value, defined as being the RT60 Reverberation Time. The RT60 value is also a function of frequency: Most rooms display a longer reverberation time at low frequencies than at high frequencies.
Two aspects are studied for considerations of a room’s reverberation time: First, there is the absolute duration of the reverberation time in seconds (either for each individual frequency band, or as a mean value). In a very live control room, mixes will end up sounding very dry, and a super dry room will make for much wetter mixes; you will compensate either way.
The second, often neglected aspect for assessing reverberation is the linearity of the reverberation time over frequency. A space with very short reverberation time at high frequencies and very long reverberation time at low frequencies is considered to sound very unbalanced, although the mean value might even be in the correct ballpark.
The analysis of the Reverberation Time of our studio control room reveals a rather unfavorable imbalance in the Reverberation Time vs. Frequency diagram. The room supports low frequencies overly dramatically, while at the same time deadening the highs. This is not an uncommon issue: Low frequency control is a major problem in small acoustic spaces due to the length of the wave.
LOW-FREQUENCY ABSORPTION

Frequency Response Measurement of a Two Way Active Audio Monitor System
Membrane Absorbers and Helmholtz Resonators are the tools for the job. Both are suitable for frequencies below about 125 Hz. A membrane absorber is a movable rubber, wood or metal membrane mounted in a frame. At certain frequencies the membrane starts to vibrate when exposed to sound pressure, transforming energy from the sound field to heat.
Helmholtz Resonators work like a glass soda bottle that can be used as a whistle: A given closed volume (the bottle) has an opening with a particular length (of the bottle neck) and a particular cross-section (diameter of the bottle neck). Helmholtz Resonators are easily incorporated in a space where otherwise unused volumes are available (e.g., a raised platform cavity in a home theater, or a void above a suspended ceiling).
For now, we will treat the control room’s problem of excessive low-frequency reverberation with the purchase of four RPG Modex Plate low-frequency membrane absorbers, each at $802.7 ($3,211).
Dirk’s measurements showed a similar problem for the Live Room, albeit with a different cause: Standing Waves. Rooms with an equal pair of dimensions (e.g., same width and height) are likely to show a strong accumulation of modal effects; we have exactly this problem in our room.
Again, we’ll treat the modal problem with the purchase of eight RPG Modex Plate low-frequency membrane absorbers at $8,02.7 a pop ($64,21.6). With optimized low frequency control in both spaces, the acoustician’s analysis gave even more insight into the acoustical behavior:
For the Control Room, the Impulse Response showed a major reflection peak shortly after the direct sound arrives at the listening position. The bounce, it turns out, was caused by a reflection off the exterior window, creating unwanted comb filtering—the reflected sound interfering with the direct sound at the listener position. Using absorption, this situation can be greatly optimized.
When sound hits an absorptive material, some part of the acoustical energy is transformed to other types of energy (mostly heat). Examples of acoustical absorbers are all sorts of porous foams or perforated/slotted surfaces, useful in controlling unwanted reflections and consequentially to decrease excessive reverberation.
An alternative method to minimize side wall reflection is to change the room geometry by angling of the walls. This will steer the reflected sound clear of the listening position to areas where it can be absorbed or dealt with in another way.
Because re-doing the walls is not possible in our room, we’ve decided to solve the sidewall reflection by employing a visually transparent, slotted Plexiglas panel of type RPG Deamp at a cost of $1,606 per side ($3,212).
And of course, these problems don’t come by themselves! The live room has a similar problem, but as we don’t want to add more absorption to the space, Dirk recommends upgrading the acoustics using diffusion.
Diffusion is used to distribute sound uniformly in space, and products are available in a range of shapes and sizes. One-dimensional diffusors contain depth variation in one dimension, forming linear divided wells or steps of varying depth, whereas two-dimensional diffusors offer depth variation in two perpendicular directions, thus forming a lattice of divided cells or steps of varying depth, looking a bit like a skyscraper skyline.
This is exactly what we need, and we’re going to purchase 12x RPG Omnifusor diffusors at $428 per item ($5136). These will be mounted on the ceiling.
So we’re done, right? Well, there’s one additional step. I’ve asked Dirk to calibrate the monitoring system, as fine-tuning a speaker system makes a world of a difference. This bonus will cost us $2,141 in services.
Most active monitors offer some type of onboard adjustments, but typically a dedicated outboard parametric equalizer or loudspeaker processor will be employed with much greater effect. The goal is to obtain a linear reproduction throughout the audio spectrum, and reducing energy is generally preferable to adding energy There are many options to choose from; I’ve decided to go for a unit I already know, the Xilica XP-8080, coming in at $1,542.
Finally, there’s the last, most fun and utterly critical step in the system calibration process: the listening test. Sitting down in the engineer’s position, listening to the audio system and the room for half an hour, and getting ready for the next mix.
I’m going to use the remaining $351 to buy Dirk an amazing meal to say thanks for helping me put this studio together!