by Dirk Noy, Walters-Storyk Design Group (WSDG)

This dream facility will look very different indeed depending on the type of person you are –the type of projects that interest you, the workflow you prefer, the amount of people you plan on collaborating with, the sort of infrastructure you intend on using, the kind of materials and color schemes you like. If the genie-solutions would be this much different the real-world scenarios within their limits of actual buildability, site limitations, materials availability and economics are even more diversified. In fact that’s exactly why folks like us still have a job.
Let me mention that the facility itself is not the real goal of any design and construction project – the real goal is enabling a creative process with the result of a properly produced, great sounding, pleasing, hopefully well selling end product. It’s like building a wood shop doesn’t guarantee nice wood chairs to come out of it – but without the wood shop there will not be any wood chairs at all.
So let’s get some order in the thinking process that goes into the design of a media facility, not so much for teaching you how to do it (and thereby putting us out of work) but to create an understanding of the process’ contributing parts and complexity.
Programming
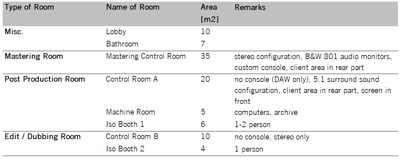
The first step in successful media facility design (and a term borrowed from architecture in general) is programming. Programming simply defined is the analysis and ultimately the re-fined listing of all the elements that will be needed for the facility. The programming statement is a list of all the required usability factors of a particular facility. In its basic shape this is often a spreadsheet listing all the required rooms with their sizes. This spreadsheet can hold further information such as information regarding large technical equipment to be put into the rooms, architectural criteria such as adjacency, ergonomics and daylight, as well as acoustical and other engineering criteria, e.g. quietness levels and heat loads. See Figure 1 for an example of a programming spreadsheet.
Summing up the floor areas of the rooms, adding circulation space plus the area used for the actual wall-building then gives the size of real estate to go on the lookout for.
Figure 1: Programming Spreadsheet
Site Selection
One would think that with the programming the hard part is done. Not true. A number of other aspects now come into play. First of all, economics. With selecting a site contracts are signed and real money is spent. As we all certainly know in the meantime (if not: open up the news-paper) real estate business very much has a life on its own. On a side note: The world has lately seen some of the traditional large studios disappear – these in fact mostly disappeared not because of failing recording business but because of irresistible real-estate offers.
Selecting a site has internal and external implications. The external implications are given by the geographical location of the facility: A remote paradise island resort will attract a different clientele than a breezy loft in the new-and-hip-part of the town. Ad agency people will appre-ciate a coffee shop nearby while the high-profile producer might prefer a discreet and secure back-door entrance. The internal implications are the criteria given by the facility’s physical needs. Key topics:
• Architecture (e.g. ceiling height, column spacing, structural soundness, egress (access), daylight availability)
• Acoustics (e.g. quietness levels, neighbors, traffic)
• Electrical Power considerations
• HVAC (Heating, Ventilation and Air Conditioning) considerations
For “the typical media production facility” an ideal physical site should have a ceiling height of about 3m or more, few widely spaced columns, a slab weight limitation of 500kg/m2 or higher, at least two independent access options, quiet (or no) neighbors, three phase AC power provisions, an easy load-in option, and a convenient place to put HVAC machinery. Daylight of course is always a plus for it can be blocked out if unwanted – the opposite is quite difficult.
Master Planning
Now having dealt with two main ingredients – the programming statement and the site selec-tion – we can actually go have some fun. The Master Planning phase combines the program-ming statement and the chosen site into a number of sketches, schemes, drawings that at the end will show real walls and doors and hallways and production rooms and will be used as a base for the final layout decision.
The Master Planning phase often starts with a bubble diagram – a site plan with bubbled clouds to roughly show a particular room’s size and location. When an interesting configura-tion has been identified this then can lead to a hand sketch (see Figure 2). The one, two or three most promising configurations are then properly drawn for presentation to the client (see Figure 3). Often, the constructive dialogue with the client will result in a fourth, fifth etc. revision of the layout, until an agreed-to Master Plan is created.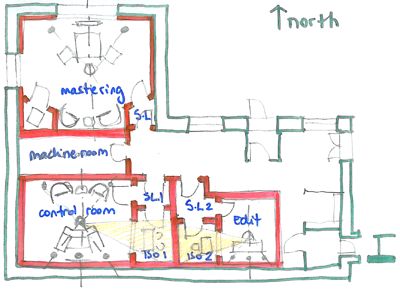
Fig 2 – Master Planning – Hand Sketch (author: Romina Larregina, WSDG
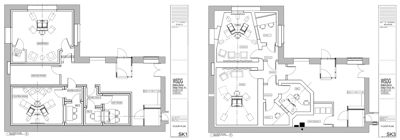 Fig 3 – Master Planning – Two Alternative Layout Versions
Acoustical Considerations and Budget
Besides architectural layout studies, the Master Planning phase is also the moment where the facility’s acoustical requirements are discussed and defined. Depending on the type of project, a variety of acoustical target values are to be considered. The parameters used most fre-quently:
• Target RT60 Reverberation Times – usually given as upper and lower limits over fre-quency (see Figure 4), as a function of room volume and use
• Target Permissible Background Noise – usually given as Noise Criteria (NC) or Grenz Kurve (GK) Value, as a function of room use (recording spaces are usually specified to have lower permissible background noise)
• Preferred Loudspeaker Placement – angles and distances, as a function of room use and audio configuration (stereo, multichannel, DVD, TV, music or film work)
• And last but not least – amount of isolation between the facility’s rooms and the neighbor-ing areas (which could be the outside of the building as well)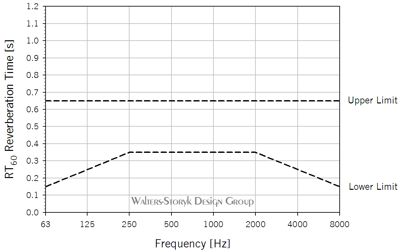
Figure 4: Target Reverberation Times for a Medium Sized Recording Room
The sound isolation is the one requirement which is most influential to the construction budget – high noise isolation equals complex construction technique equals higher cost. In most modern facilites, some form of room-within-room construction is required due to the sheer density of the rooms – nobody is that particularly interested to hear the neighbor engi-neer’s film soundtrack interfering with one’s vocal recording.
Regular two wall systems with floating floors and suspended ceilings can achieve a noise iso-lation value (Sound Transmission Class) of about 60..70dB. This is fine for e.g. a control room > iso booth wall, but not sufficient for two adjacent, independently operated post pro-duction rooms – meaning that three wall or even more complex systems need to be employed. More bad news: Not only the wall systems need to get more complex, the same is also true for sound isolating windows, doors and the HVAC systems.
In terms of construction budget, the easiest way to properly isolate two rooms with strong quietness requirements is to position the two rooms far apart from each other – which is not always feasible. Second best is have the rooms on separate concrete slabs, which is usually only possible in groundup construction.
For all of us others that need high sound isolation in close proximity – we will have to brace for the construction complexity – or continue rubbing these beer bottles until one day the ge-nie really does appear – and now at least we know what to tell him about our dream facility!
Read next Resolution article on Room within Room Construction

